4 posts tagged with "linux"

View All Tags

· 10 min read
CheverJohn

本文由 简悦 SimpRead 转码, 原文地址 www.cnblogs.com

Linux 环境变量配置

在自定义安装软件的时候,经常需要配置环境变量,下面列举出各种对环境变量的配置方法。

下面所有例子的环境说明如下:

  • 系统:Ubuntu 14.0
  • 用户名:uusama
  • 需要配置 MySQL 环境变量路径:/home/uusama/mysql/bin

Linux 读取环境变量

读取环境变量的方法:

  • export命令显示当前系统定义的所有环境变量
  • echo $PATH命令输出当前的PATH环境变量的值

这两个命令执行的效果如下

uusama@ubuntu:~$ export
declare -x HOME="/home/uusama"
declare -x LANG="en_US.UTF-8"
declare -x LANGUAGE="en_US:"
declare -x LESSCLOSE="/usr/bin/lesspipe %s %s"
declare -x LESSOPEN="| /usr/bin/lesspipe %s"
declare -x LOG
declare -x MAIL="/var/mail/uusama"
declare -x PATH="/home/uusama/bin:/home/uusama/.local/bin:/usr/local/sbin:/usr/local/bin:/usr/sbin:/usr/bin:/sbin:/bin"
declare -x SSH_TTY="/dev/pts/0"
declare -x TERM="xterm"
declare -x USER="uusama"

uusama@ubuntu:~$ echo $PATH
/home/uusama/bin:/home/uusama/.local/bin:/usr/local/sbin:/usr/local/bin:/usr/sbin:/usr/bin:/sbin:/bin

其中PATH变量定义了运行命令的查找路径,以冒号:分割不同的路径,使用export定义的时候可加双引号也可不加。

Linux 环境变量配置方法一:export PATH

使用export命令直接修改PATH的值,配置 MySQL 进入环境变量的方法:

export PATH=/home/uusama/mysql/bin:$PATH

# 或者把PATH放在前面
export PATH=$PATH:/home/uusama/mysql/bin

注意事项:

  • 生效时间:立即生效
  • 生效期限:当前终端有效,窗口关闭后无效
  • 生效范围:仅对当前用户有效
  • 配置的环境变量中不要忘了加上原来的配置,即$PATH部分,避免覆盖原来配置

Linux 环境变量配置方法二:vim ~/.bashrc

通过修改用户目录下的~/.bashrc文件进行配置:

vim ~/.bashrc

# 在最后一行加上
export PATH=$PATH:/home/uusama/mysql/bin

注意事项:

  • 生效时间:使用相同的用户打开新的终端时生效,或者手动source ~/.bashrc生效
  • 生效期限:永久有效
  • 生效范围:仅对当前用户有效
  • 如果有后续的环境变量加载文件覆盖了PATH定义,则可能不生效

Linux 环境变量配置方法三:vim ~/.bash_profile

和修改~/.bashrc文件类似,也是要在文件最后加上新的路径即可:

vim ~/.bash_profile

# 在最后一行加上
export PATH=$PATH:/home/uusama/mysql/bin

注意事项:

  • 生效时间:使用相同的用户打开新的终端时生效,或者手动source ~/.bash_profile生效
  • 生效期限:永久有效
  • 生效范围:仅对当前用户有效
  • 如果没有~/.bash_profile文件,则可以编辑~/.profile文件或者新建一个

Linux 环境变量配置方法四:vim /etc/bashrc

该方法是修改系统配置,需要管理员权限(如 root)或者对该文件的写入权限:

# 如果/etc/bashrc文件不可编辑,需要修改为可编辑
chmod -v u+w /etc/bashrc

vim /etc/bashrc

# 在最后一行加上
export PATH=$PATH:/home/uusama/mysql/bin

注意事项:

  • 生效时间:新开终端生效,或者手动source /etc/bashrc生效
  • 生效期限:永久有效
  • 生效范围:对所有用户有效

Linux 环境变量配置方法五:vim /etc/profile

该方法修改系统配置,需要管理员权限或者对该文件的写入权限,和vim /etc/bashrc类似:

# 如果/etc/profile文件不可编辑,需要修改为可编辑
chmod -v u+w /etc/profile

vim /etc/profile

# 在最后一行加上
export PATH=$PATH:/home/uusama/mysql/bin

注意事项:

  • 生效时间:新开终端生效,或者手动source /etc/profile生效
  • 生效期限:永久有效
  • 生效范围:对所有用户有效

Linux 环境变量配置方法六:vim /etc/environment

该方法是修改系统环境配置文件,需要管理员权限或者对该文件的写入权限:

# 如果/etc/bashrc文件不可编辑,需要修改为可编辑
chmod -v u+w /etc/environment

vim /etc/profile

# 在最后一行加上
export PATH=$PATH:/home/uusama/mysql/bin

注意事项:

  • 生效时间:新开终端生效,或者手动source /etc/environment生效
  • 生效期限:永久有效
  • 生效范围:对所有用户有效

Linux 环境变量加载原理解析

上面列出了环境变量的各种配置方法,那么 Linux 是如何加载这些配置的呢?是以什么样的顺序加载的呢?

特定的加载顺序会导致相同名称的环境变量定义被覆盖或者不生效。

环境变量的分类

环境变量可以简单的分成用户自定义的环境变量以及系统级别的环境变量。

  • 用户级别环境变量定义文件:~/.bashrc~/.profile(部分系统为:~/.bash_profile
  • 系统级别环境变量定义文件:/etc/bashrc/etc/profile(部分系统为:/etc/bash_profile)、/etc/environment

另外在用户环境变量中,系统会首先读取~/.bash_profile(或者~/.profile)文件,如果没有该文件则读取~/.bash_login,根据这些文件中内容再去读取~/.bashrc

测试 Linux 环境变量加载顺序的方法

为了测试各个不同文件的环境变量加载顺序,我们在每个环境变量定义文件中的第一行都定义相同的环境变量UU_ORDER,该变量的值为本身的值连接上当前文件名称。

需要修改的文件如下:

  • /etc/environment
  • /etc/profile
  • /etc/profile.d/test.sh,新建文件,没有文件夹可略过
  • /etc/bashrc,或者/etc/bash.bashrc
  • ~/.bash_profile,或者~/.profile
  • ~/.bashrc

在每个文件中的第一行都加上下面这句代码,并相应的把冒号后的内容修改为当前文件的绝对文件名。

export UU_ORDER="$UU_ORDER:~/.bash_profile"

修改完之后保存,新开一个窗口,然后echo $UU_ORDER观察变量的值:

uusama@ubuntu:~$ echo $UU_ORDER
$UU_ORDER:/etc/environment:/etc/profile:/etc/bash.bashrc:/etc/profile.d/test.sh:~/.profile:~/.bashrc

可以推测出 Linux 加载环境变量的顺序如下:

  1. /etc/environment
  2. /etc/profile
  3. /etc/bash.bashrc
  4. /etc/profile.d/test.sh
  5. ~/.profile
  6. ~/.bashrc

Linux 环境变量文件加载详解

由上面的测试可容易得出 Linux 加载环境变量的顺序如下,:

系统环境变量 -> 用户自定义环境变量
/etc/environment -> /etc/profile -> ~/.profile

打开/etc/profile文件你会发现,该文件的代码中会加载/etc/bash.bashrc文件,然后检查/etc/profile.d/目录下的.sh文件并加载。

# /etc/profile: system-wide .profile file for the Bourne shell (sh(1))
# and Bourne compatible shells (bash(1), ksh(1), ash(1), ...).

if [ "$PS1" ]; then
if [ "$BASH" ] && [ "$BASH" != "/bin/sh" ]; then
# The file bash.bashrc already sets the default PS1.
# PS1='\h:\w\$ '
if [ -f /etc/bash.bashrc ]; then
. /etc/bash.bashrc
fi
else
if [ "`id -u`" -eq 0 ]; then
PS1='# '
else
PS1='$ '
fi
fi
fi

if [ -d /etc/profile.d ]; then
for i in /etc/profile.d/*.sh; do
if [ -r $i ]; then
. $i
fi
done
unset i
fi

其次再打开~/.profile文件,会发现该文件中加载了~/.bashrc文件。

# if running bash
if [ -n "$BASH_VERSION" ]; then
# include .bashrc if it exists
if [ -f "$HOME/.bashrc" ]; then
. "$HOME/.bashrc"
fi
fi

# set PATH so it includes user's private bin directories
PATH="$HOME/bin:$HOME/.local/bin:$PATH"

~/.profile文件中代码不难发现,/.profile文件只在用户登录的时候读取一次,而/.bashrc会在每次运行Shell脚本的时候读取一次。

一些小技巧

可以自定义一个环境变量文件,比如在某个项目下定义uusama.profile,在这个文件中使用export定义一系列变量,然后在~/.profile文件后面加上:sourc uusama.profile,这样你每次登陆都可以在 Shell 脚本中使用自己定义的一系列变量。

也可以使用alias命令定义一些命令的别名,比如alias rm="rm -i"(双引号必须),并把这个代码加入到~/.profile中,这样你每次使用rm命令的时候,都相当于使用rm -i命令,非常方便。

· 12 min read
CheverJohn

本篇博客第一部分受到了这篇博文的启发。

TL; DR

将结论写在前头

事实上,为什么我们很多人在接触一个新的项目时候会遇到各种各样的坑呢?

根据这一次的经历来看,其中的主要原因还是在于本地部署环境的不完备。本次踩坑经历,其实问题就是在 git 啦、gcc 啦等之类看似很常见的东西,实际并没有配置好,然后咱们的项目文档书写者呢,默认了你已经完全配置好这些基本的东西了。唉,但是谁能想到大多数人都会是在虚拟机、wsl、docker上配置,看来 docker 其实更具有实用性,可以当做乐高组件一样,什么时候想用哪几个,直接拼凑起来,就是一个了,不扯远了。

这边先说清楚成功部署APISIX项目,系统需要具备的最基本的东西:

  • git的安装
    • 与Github进行ssh连接得做好
    • git 代理得做好
  • 本地的ssh公钥密钥得有(具体查看.ssh文件夹)
  • centos7应该安装的基本库
    • wget
    • unzip
    • git
    • gcc
    • yum update(重要!!!)

第一部分:安装

安装 APISIX 运行环境依赖

基本方法内容来自于官方文档;

安装 etcd

命令:

wget https://github.com/etcd-io/etcd/releases/download/v3.4.13/etcd-v3.4.13-linux-amd64.tar.gz
tar -xvf etcd-v3.4.13-linux-amd64.tar.gz && \
cd etcd-v3.4.13-linux-amd64 && \
sudo cp -a etcd etcdctl /usr/bin/

安装 OpenResty

命令:

sudo yum install yum-utils
sudo yum-config-manager --add-repo https://openresty.org/package/centos/openresty.repo

# 安装 OpenResty 和 编译工具
sudo yum install -y openresty curl git gcc openresty-openssl111-devel unzip pcre pcre-devel

# 安装 LuaRocks
curl https://raw.githubusercontent.com/apache/apisix/master/utils/linux-install-luarocks.sh -sL | bash -

然后才能正常启动 etcd

nohup etcd &

第二部分:踩坑

问题一:

LUAROCKS_1

[root@MiWiFi-R4CM-srv apisix-2.10.3]# LUAROCKS_SERVER=https://luarocks.cn make deps
/bin/bash: luarocks: command not found
WARN: You're not using LuaRocks 3.x, please add the following items to your LuaRocks config file:
variables = {
OPENSSL_LIBDIR=/usr/local/openresty/openssl111/lib
OPENSSL_INCDIR=/usr/local/openresty/openssl111/include
}
luarocks install rockspec/apisix-master-0.rockspec --tree=deps --only-deps --local --server https://luarocks.cn
/bin/bash: luarocks: command not found
make: *** [deps] Error 127
[root@MiWiFi-R4CM-srv apisix-2.10.3]# ^C

解决方法

curl https://raw.githubusercontent.com/apache/apisix/master/utils/linux-install-luarocks.sh -sL | bash -

问题二(接问题一):

当运行了上面的命令后,又出现新的问题,看来是治标不治本啊

Solved_crul_by_installing_sth

[root@MiWiFi-R4CM-srv apisix-2.10.3]# curl https://raw.githubusercontent.com/apache/apisix/master/utils/linux-install-luarocks.sh -sL | bash -
+ '[' -z ']'
+ OPENRESTY_PREFIX=/usr/local/openresty
+ LUAROCKS_VER=3.8.0
+ wget https://github.com/luarocks/luarocks/archive/v3.8.0.tar.gz
--2022-01-18 04:53:17-- https://github.com/luarocks/luarocks/archive/v3.8.0.tar.gz
Resolving github.com (github.com)... 20.205.243.166
Connecting to github.com (github.com)|20.205.243.166|:443... connected.
HTTP request sent, awaiting response... 302 Found
Location: https://codeload.github.com/luarocks/luarocks/tar.gz/v3.8.0 [following]
--2022-01-18 04:53:18-- https://codeload.github.com/luarocks/luarocks/tar.gz/v3.8.0
Resolving codeload.github.com (codeload.github.com)... 20.205.243.165
Connecting to codeload.github.com (codeload.github.com)|20.205.243.165|:443... connected.
HTTP request sent, awaiting response... 200 OK
Length: 5389112 (5.1M) [application/x-gzip]
Saving to: ‘v3.8.0.tar.gz’

100%[====================================================================================================================================================================>] 5,389,112 1.71MB/s in 3.0s

2022-01-18 04:53:22 (1.71 MB/s) - ‘v3.8.0.tar.gz’ saved [5389112/5389112]

+ tar -xf v3.8.0.tar.gz
+ cd luarocks-3.8.0
+ OR_BIN=/usr/local/openresty/bin/openresty
++ /usr/local/openresty/bin/openresty -v
++ awk -F / '{print $2}'
++ awk -F . '{print $1"."$2}'
+ OR_VER=1.19
+ [[ -e /usr/local/openresty/bin/openresty ]]
+ [[ 1.19 == 1.19 ]]
+ WITH_LUA_OPT=--with-lua=/usr/local/openresty/luajit
+ ./configure --with-lua=/usr/local/openresty/luajit
+ cat build.log

Configuring LuaRocks version 3.8.0...

Lua version detected: 5.1
Lua interpreter found: /usr/local/openresty/luajit/bin/luajit
lua.h found: /usr/local/openresty/luajit/include/luajit-2.1/lua.h
Could not find 'unzip'.
Make sure it is installed and available in your PATH.

configure failed.

+ exit 1
[root@MiWiFi-R4CM-srv apisix-2.10.3]# sudo yum install wget sudo unzip
Loaded plugins: fastestmirror
Loading mirror speeds from cached hostfile
* base: mirrors.aliyun.com
* extras: mirrors.163.com
* updates: mirrors.163.com

解决方法:

sudo yum install wget sudo unzip

问题三(接问题二):

继续运行

[root@MiWiFi-R4CM-srv apisix-2.10.3]# curl https://raw.githubusercontent.com/apache/apisix/master/utils/linux-install-luarocks.sh -sL | bash -

发现还有问题

install_gcc

解决方法:

yum -y install gcc

直接解决了问题

[root@MiWiFi-R4CM-srv apisix-2.10.3]# yum -y install gcc
Loaded plugins: fastestmirror
Loading mirror speeds from cached hostfile
* base: mirrors.aliyun.com
* extras: mirrors.163.com
* updates: mirrors.163.com
Resolving Dependencies
--> Running transaction check
---> Package gcc.x86_64 0:4.8.5-44.el7 will be installed
--> Processing Dependency: cpp = 4.8.5-44.el7 for package: gcc-4.8.5-44.el7.x86_64
--> Processing Dependency: glibc-devel >= 2.2.90-12 for package: gcc-4.8.5-44.el7.x86_64
--> Processing Dependency: libmpfr.so.4()(64bit) for package: gcc-4.8.5-44.el7.x86_64
--> Processing Dependency: libmpc.so.3()(64bit) for package: gcc-4.8.5-44.el7.x86_64
--> Running transaction check
---> Package cpp.x86_64 0:4.8.5-44.el7 will be installed
---> Package glibc-devel.x86_64 0:2.17-325.el7_9 will be installed
--> Processing Dependency: glibc-headers = 2.17-325.el7_9 for package: glibc-devel-2.17-325.el7_9.x86_64
--> Processing Dependency: glibc = 2.17-325.el7_9 for package: glibc-devel-2.17-325.el7_9.x86_64
--> Processing Dependency: glibc-headers for package: glibc-devel-2.17-325.el7_9.x86_64
---> Package libmpc.x86_64 0:1.0.1-3.el7 will be installed
---> Package mpfr.x86_64 0:3.1.1-4.el7 will be installed
--> Running transaction check
---> Package glibc.x86_64 0:2.17-317.el7 will be updated
--> Processing Dependency: glibc = 2.17-317.el7 for package: glibc-common-2.17-317.el7.x86_64
---> Package glibc.x86_64 0:2.17-325.el7_9 will be an update
---> Package glibc-headers.x86_64 0:2.17-325.el7_9 will be installed
--> Processing Dependency: kernel-headers >= 2.2.1 for package: glibc-headers-2.17-325.el7_9.x86_64
--> Processing Dependency: kernel-headers for package: glibc-headers-2.17-325.el7_9.x86_64
--> Running transaction check
---> Package glibc-common.x86_64 0:2.17-317.el7 will be updated
---> Package glibc-common.x86_64 0:2.17-325.el7_9 will be an update
---> Package kernel-headers.x86_64 0:3.10.0-1160.49.1.el7 will be installed
--> Finished Dependency Resolution

Dependencies Resolved

==============================================================================================================================================================================================================
Package Arch Version Repository Size
==============================================================================================================================================================================================================
Installing:
gcc x86_64 4.8.5-44.el7 base 16 M
Installing for dependencies:
cpp x86_64 4.8.5-44.el7 base 5.9 M
glibc-devel x86_64 2.17-325.el7_9 updates 1.1 M
glibc-headers x86_64 2.17-325.el7_9 updates 691 k
kernel-headers x86_64 3.10.0-1160.49.1.el7 updates 9.0 M
libmpc x86_64 1.0.1-3.el7 base 51 k
mpfr x86_64 3.1.1-4.el7 base 203 k
Updating for dependencies:
glibc x86_64 2.17-325.el7_9 updates 3.6 M
glibc-common x86_64 2.17-325.el7_9 updates 12 M

Transaction Summary
==============================================================================================================================================================================================================
Install 1 Package (+6 Dependent packages)
Upgrade ( 2 Dependent packages)

Total download size: 48 M
Downloading packages:
Delta RPMs disabled because /usr/bin/applydeltarpm not installed.
(1/9): cpp-4.8.5-44.el7.x86_64.rpm | 5.9 MB 00:00:04
(2/9): glibc-headers-2.17-325.el7_9.x86_64.rpm | 691 kB 00:00:00
(3/9): glibc-devel-2.17-325.el7_9.x86_64.rpm | 1.1 MB 00:00:05
(4/9): libmpc-1.0.1-3.el7.x86_64.rpm | 51 kB 00:00:00
(5/9): mpfr-3.1.1-4.el7.x86_64.rpm | 203 kB 00:00:00
(6/9): glibc-common-2.17-325.el7_9.x86_64.rpm | 12 MB 00:00:08
(7/9): gcc-4.8.5-44.el7.x86_64.rpm | 16 MB 00:00:08
(8/9): kernel-headers-3.10.0-1160.49.1.el7.x86_64.rpm | 9.0 MB 00:00:04
(9/9): glibc-2.17-325.el7_9.x86_64.rpm | 3.6 MB 00:00:10
--------------------------------------------------------------------------------------------------------------------------------------------------------------------------------------------------------------
Total 4.7 MB/s | 48 MB 00:00:10
Running transaction check
Running transaction test
Transaction test succeeded
Running transaction
Updating : glibc-2.17-325.el7_9.x86_64 1/11
Updating : glibc-common-2.17-325.el7_9.x86_64 2/11
Installing : mpfr-3.1.1-4.el7.x86_64 3/11
Installing : libmpc-1.0.1-3.el7.x86_64 4/11
Installing : cpp-4.8.5-44.el7.x86_64 5/11
Installing : kernel-headers-3.10.0-1160.49.1.el7.x86_64 6/11
Installing : glibc-headers-2.17-325.el7_9.x86_64 7/11
Installing : glibc-devel-2.17-325.el7_9.x86_64 8/11
Installing : gcc-4.8.5-44.el7.x86_64 9/11
Cleanup : glibc-2.17-317.el7.x86_64 10/11
Cleanup : glibc-common-2.17-317.el7.x86_64 11/11
Verifying : mpfr-3.1.1-4.el7.x86_64 1/11
Verifying : glibc-devel-2.17-325.el7_9.x86_64 2/11
Verifying : gcc-4.8.5-44.el7.x86_64 3/11
Verifying : glibc-headers-2.17-325.el7_9.x86_64 4/11
Verifying : kernel-headers-3.10.0-1160.49.1.el7.x86_64 5/11
Verifying : libmpc-1.0.1-3.el7.x86_64 6/11
Verifying : glibc-common-2.17-325.el7_9.x86_64 7/11
Verifying : glibc-2.17-325.el7_9.x86_64 8/11
Verifying : cpp-4.8.5-44.el7.x86_64 9/11
Verifying : glibc-2.17-317.el7.x86_64 10/11
Verifying : glibc-common-2.17-317.el7.x86_64 11/11

Installed:
gcc.x86_64 0:4.8.5-44.el7

Dependency Installed:
cpp.x86_64 0:4.8.5-44.el7 glibc-devel.x86_64 0:2.17-325.el7_9 glibc-headers.x86_64 0:2.17-325.el7_9 kernel-headers.x86_64 0:3.10.0-1160.49.1.el7 libmpc.x86_64 0:1.0.1-3.el7 mpfr.x86_64 0:3.1.1-4.el7

Dependency Updated:
glibc.x86_64 0:2.17-325.el7_9 glibc-common.x86_64 0:2.17-325.el7_9

Complete!

Complete_by_install_gcc

问题四(搁浅中......):

这边的LUAROCKS是针对于

开始LUAROCKS_SERVER......

[root@MiWiFi-R4CM-srv apisix-2.10.3]# LUAROCKS_SERVER=https://luarocks.cn make deps

爆出问题

solve

分析问题:

[root@MiWiFi-R4CM-srv apisix-2.10.3]# LUAROCKS_SERVER=https://luarocks.cn make deps
…………………………………………………………………………………………………………………………………………………………………………
lua-resty-dns-client 5.2.0-1 depends on luaxxhash >= 1.0 (not installed)
Installing https://luarocks.cn/luaxxhash-1.0.0-1.rockspec

Error: Failed installing dependency: https://luarocks.cn/lua-resty-dns-client-5.2.0-1.src.rock - Failed installing dependency: https://luarocks.cn/luaxxhash-1.0.0-1.rockspec - 'git' program not found. Make sure Git is installed and is available in your PATH (or you may want to edit the 'variables.GIT' value in file '/root/.luarocks/config-5.1.lua')
make: *** [deps] Error 1
[root@MiWiFi-R4CM-srv apisix-2.10.3]# yum install -y git

很明显就是没有安装配置好git嘛

config_git

lua-resty-dns-client 5.2.0-1 depends on lua >= 5.1, < 5.4 (5.1-1 provided by VM)
lua-resty-dns-client 5.2.0-1 depends on penlight ~> 1 (1.12.0-1 installed)
lua-resty-dns-client 5.2.0-1 depends on lrandom (20180729-1 installed)
lua-resty-dns-client 5.2.0-1 depends on lua-resty-timer ~> 1 (1.1.0-1 installed)
lua-resty-dns-client 5.2.0-1 depends on binaryheap >= 0.4 (0.4-1 installed)
lua-resty-dns-client 5.2.0-1 depends on luaxxhash >= 1.0 (not installed)
Installing https://luarocks.cn/luaxxhash-1.0.0-1.rockspec
Cloning into 'luaxxhash'...
error: RPC failed; result=35, HTTP code = 0
fatal: The remote end hung up unexpectedly

Error: Failed installing dependency: https://luarocks.cn/lua-resty-dns-client-5.2.0-1.src.rock - Failed installing dependency: https://luarocks.cn/luaxxhash-1.0.0-1.rockspec - Failed cloning git repository.
make: *** [deps] Error 1
[root@MiWiFi-R4CM-srv apisix-2.10.3]# ls
apisix bin CHANGELOG.md CODE_OF_CONDUCT.md CODE_STYLE.md conf CONTRIBUTING.md deps LICENSE Makefile NOTICE powered-by.md README.md rockspec v3.8.0.tar.gz v3.8.0.tar.gz.1
[root@MiWiFi-R4CM-srv apisix-2.10.3]#
[root@MiWiFi-R4CM-srv apisix-2.10.3]# cd ..
[root@MiWiFi-R4CM-srv api7]# ls
apache-apisix-2.10.3-src.tgz apisix-2.10.3
[root@MiWiFi-R4CM-srv api7]# git clone git@github.com:Chever-John/JohnChever-Blog.git
Cloning into 'JohnChever-Blog'...
The authenticity of host 'github.com (20.205.243.166)' can't be established.
ECDSA key fingerprint is SHA256:p2QAMXNIC1TJYWeIOttrVc98/R1BUFWu3/LiyKgUfQM.
ECDSA key fingerprint is MD5:7b:99:81:1e:4c:91:a5:0d:5a:2e:2e:80:13:3f:24:ca.
Are you sure you want to continue connecting (yes/no)? yes
Warning: Permanently added 'github.com,20.205.243.166' (ECDSA) to the list of known hosts.
Permission denied (publickey).
fatal: Could not read from remote repository.

Please make sure you have the correct access rights
and the repository exists.
[root@MiWiFi-R4CM-srv api7]# git clone git@github.com:Chever-John/JohnChever-Blog.git
Cloning into 'JohnChever-Blog'...
Permission denied (publickey).
fatal: Could not read from remote repository.

Please make sure you have the correct access rights
and the repository exists.
[root@MiWiFi-R4CM-srv api7]# git config --global user.name "CheverJohn"
[root@MiWiFi-R4CM-srv api7]# git config --global user.email "cheverjonathan@gmail.com"
[root@MiWiFi-R4CM-srv api7]# git config --list
user.name=CheverJohn
user.email=cheverjonathan@gmail.com
[root@MiWiFi-R4CM-srv api7]# ssh-keygen -t rsa -C "cheverjonathan@gmail.com"
Generating public/private rsa key pair.
Enter file in which to save the key (/root/.ssh/id_rsa):
Enter passphrase (empty for no passphrase):
Enter same passphrase again:
Your identification has been saved in /root/.ssh/id_rsa.
Your public key has been saved in /root/.ssh/id_rsa.pub.
The key fingerprint is:
SHA256:XVvMrYv9c92MVJm8CMUmZA44WgYv+atEOydMkpWc0I8 cheverjonathan@gmail.com
The key's randomart image is:
+---[RSA 2048]----+
| .... ...o. |
| o.== +. * . |
| B*.. .= = +|
| oEo. . o o =.|
| o o .S . o o..|
| = . . +.o |
| * o ..ooo|
| . = .o=|
| . +|
+----[SHA256]-----+
[root@MiWiFi-R4CM-srv api7]# cat /root/.ssh
cat: /root/.ssh: Is a directory
[root@MiWiFi-R4CM-srv api7]# ls
apache-apisix-2.10.3-src.tgz apisix-2.10.3
[root@MiWiFi-R4CM-srv api7]# cd /root/.ssh
[root@MiWiFi-R4CM-srv .ssh]# ls
id_rsa id_rsa.pub known_hosts
[root@MiWiFi-R4CM-srv .ssh]# cat id_rsa.pub
接下来显示就是生成的ssh密钥了,将其复制到github上的ssh里即可

继续LUAROCKS_SERVER......

LUAROCKS_SERVER=https://luarocks.cn make deps

还是出现了问题

maybe_git_proxy

怀疑是git代理的问题!!!

这边开始暂时不搞apisix中的LUAROCKS了,开始按照官网的需求准备

未解决!!!

问题五:前提需求准备中的wget问题

然后遇到了wget问题

如果使用wget的话,会出现一个

just_yum_update

遇到Unable to establish SSL connection的报错

这个时候,只需要轻轻yum update即可,原因是未更新前的centos里的库大部分是老旧的,特别是导致这个问题的openssl。

此处(指yum update)收到了该链接的灵感。

当我们yum update之后,即可成功

然后运行wget,至此wget https://github.com/etcd-io/etcd/releases/download/v3.4.13/etcd-v3.4.13-linux-amd64.tar.gz完美解决,结束了。

成功结束的样子

finish

问题六:继续回到问题四

LUAROCKS_SERVER继续在apisix-2.10.3文件中进行运行

// 遇到问题!
apisix master-0 depends on lua-resty-ngxvar 0.5.2 (not installed)
Installing https://luarocks.cn/lua-resty-ngxvar-0.5.2-0.rockspec
Cloning into 'lua-var-nginx-module'...
fatal: unable to access 'https://github.com/api7/lua-var-nginx-module/': Encountered end of file

Error: Failed installing dependency: https://luarocks.cn/lua-resty-ngxvar-0.5.2-0.rockspec - Failed cloning git repository.
make: *** [deps] Error 1
[root@MiWiFi-R4CM-srv apisix-2.10.3]#

完成etcd的安装

finish_etcd

这边根据链接讲的东西从而进行etcd的安装。

All Done

上一张证明自己All Done的截图照片

All-Done-Solved_Problems

试试证明确实使用git proxy代理好,一下子就能解决所有问题了。

git_proxy

列出一些算是对我有所帮助的链接地址吧

https://www.mihu.live/archives/208/ https://zhuanlan.zhihu.com/p/120038973

晚上再来把文字搞好看一点

请忽略的etcd文件夹目录,刚刚运行起etcd了。so就急匆匆curl咯,根据这处链接及其提供的命令和结果,得以判断咱们的Apache APISIX是否已经成功启动。

· 3 min read
CheverJohn

本文由 简悦 SimpRead 转码, 原文地址 www.ha97.com

本人以前一直习惯直接使用 root,很少使用 su,前几天才发现 su 与 su - 命令是有着本质区别的!

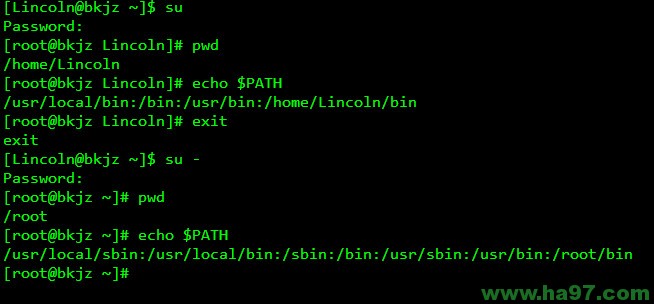
大部分 Linux 发行版的默认账户是普通用户,而更改系统文件或者执行某些命令,需要 root 身份才能进行,这就需要从当前用户切换到 root 用户。Linux 中切换用户的命令是 su 或 su -。前天我在使用 useradd 这个命令时,才体会到这两者的本质区别。如图:

su

我首先是用 su 命令切换到 root 身份的,但是运行 useradd 时,出现错误:bash: useradd: command not found。google 了一下,原因是在这个用 su 命令切换过来的 root 用户上。

su 命令和 su - 命令最大的本质区别就是:前者只是切换了 root 身份,但 Shell 环境仍然是普通用户的 Shell;而后者连用户和 Shell 环境一起切换成 root 身份了。只有切换了 Shell 环境才不会出现 PATH 环境变量错误。su 切换成 root 用户以后,pwd 一下,发现工作目录仍然是普通用户的工作目录;而用 su - 命令切换以后,工作目录变成 root 的工作目录了。用 echo $PATH 命令看一下 su 和 su - 以后的环境变量有何不同。以此类推,要从当前用户切换到其它用户也一样,应该使用 su - 命令。如图:

su-

Linux 就是这样,有时候配置文件多了或者少了一个空格,服务就运行不了。细节问题一定要注意,这样才能少走弯路!

· 2 min read
CheverJohn

小知识点(未进行总结)

  1. 新安装的debian系统,root用户无法远程登录。

网络配置方面

网络配置一般是通过修改

/etc/network

路径的

interfaces文件的路径

interfaces文件,进行对网络的进一步配置的。

interfaces文件内容

配置完成后,要进行更新,更新命令如下

sudo ifdown wlan0 && sudo ifup wlan0

https://askubuntu.com/questions/333063/restart-network-interface-after-editing-etc-network-interfaces

可以查看上面链接进一步了解。

查看系统版本

root@DESKTOP-8VUVO1M:~# lsb_release -d
Description: Debian GNU/Linux 11 (bullseye)
root@DESKTOP-8VUVO1M:~# lsb_release -a
No LSB modules are available.
Distributor ID: Debian
Description: Debian GNU/Linux 11 (bullseye)
Release: 11
Codename: bullseye
root@DESKTOP-8VUVO1M:~# cat /etc/issue
Debian GNU/Linux 11 \n \l

root@DESKTOP-8VUVO1M:~# cat /etc/os-release
PRETTY_NAME="Debian GNU/Linux 11 (bullseye)"
NAME="Debian GNU/Linux"
VERSION_ID="11"
VERSION="11 (bullseye)"
VERSION_CODENAME=bullseye
ID=debian
HOME_URL="https://www.debian.org/"
SUPPORT_URL="https://www.debian.org/support"
BUG_REPORT_URL="https://bugs.debian.org/"

以上大概就是熟知的几种方法咯,写个blog记录一下。

终于还是暂时放弃了Raspberry Pi4B

先暂时用wsl叭

wsl-debian